Barrel Oven Build

Early sketch of the Barrel Oven
It’ll only take me a month or so, I said.
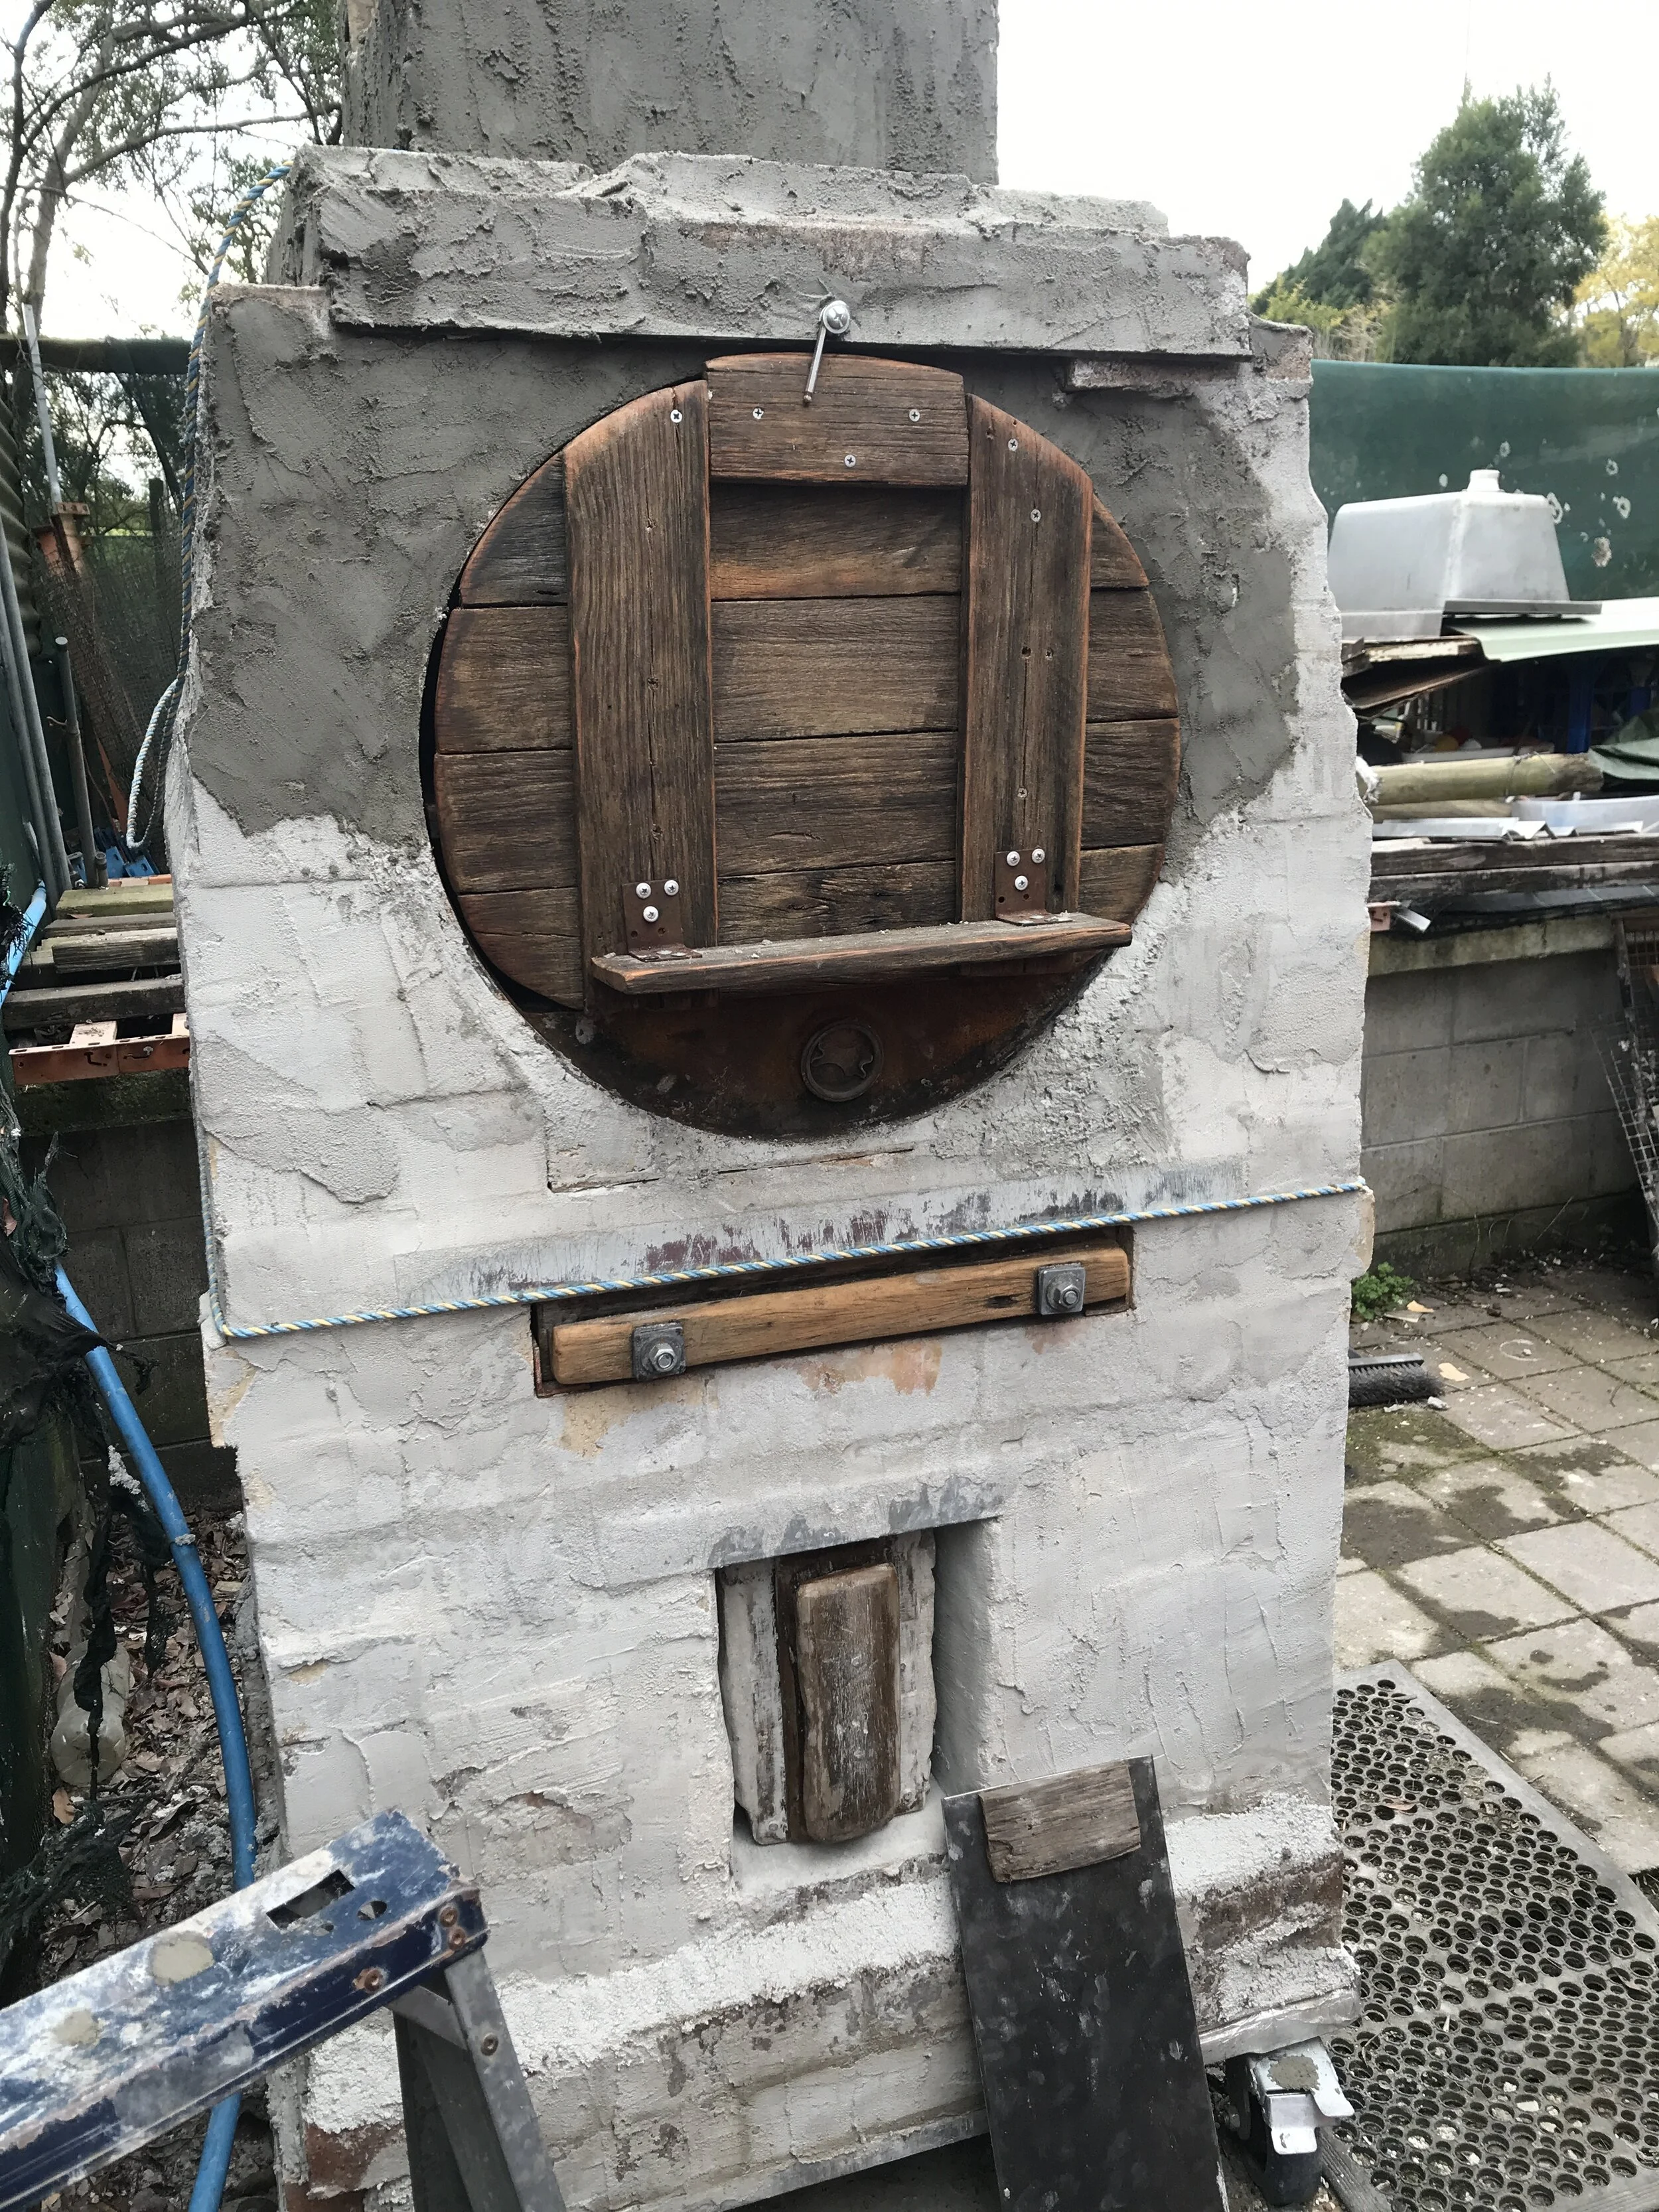
Six months later and I’m starting to see the end of the process. As I write this, I’ve done a couple of little fires to cure the masonry, and two trial bakes of 14 loaves each to see how things work. I’ve made some running repairs after each burn, and I’m finally wrapping the whole thing in render. It will be a lovely pink/orange colour when it’s finished.
The Design Brief
Firing it up has surprised me. The oven has definitely achieved part of the design brief - to be able to heat up from cold in 60 minutes. I’ve fired her up four times now, and the last three have made 220C easily. The fourth firing achieved 220C in just 15 minutes! In fact, the fourth burn achieved well over 350C in that time - I didn’t expect this at all.
The second part of the brief was to be able to bake between 12 and 20 loaves per hour. The first trial bake failed at achieving this - the oven achieved 7 loaves per hour at best. At the time I put it down to learning to drive the oven, and having sufficient dry wood on hand to really push it. Ovens, like cars, need to be learned, and they need the right fuel. My previous prototype oven took half a dozen bakes before I was able to drive it along at speed.
The second trial bake was MUCH faster - I only had 14 loaves again, but this time I had the bulk of them baked in under an hour. I will need to do a larger trial bake to get better data on throughput, but I believe the oven would easily be capable of the high end of the original brief - which is around 20 loaves per hour. This is very exciting!

Unfortunately, like half of the country, we are locked down due to Covid restrictions, so I can’t get to the sawmill at the moment, and they don’t deliver. I’ve been buying bags of wood locally, and using whatever else I have to burn from the workshop here. This has meant a mixed result each time, so without a common yardstick (consistent fuel) it’s difficult to get precise data sets, however the fourth burn really showed me just how quick this oven was going to be. I used substantially less fuel than in the previous 3 burns, and yet the chamber was consistently hotter.
This oven has been specifically designed as a small commercial baker’s oven. There are lots of micro bakeries baking once or twice a week, and this oven is intended to be for this type of use. It can heat up quickly, and be capable of baking up to a hundred or so loaves per session without taking an eternity to do so.
My idea is to develop a DIY set of plans for the oven so that people can build their own and get their micro bakery up and running without going into debt. Part of the design brief was to utilise reclaimed and upcycled materials wherever possible. To this end, 95% of the build has satisfied that part of the brief, with only the base, castors and masonry inputs (cement, sand, clay, perlite, lime etc) having to be purchased new. Everything else has been scrounged or purchased second hand.
Finally, I set myself the task of creating a super clean wood fired oven, which would create as little pollutants as possible. Thus, I designed the oven as a ‘gasifier’, that is, to be able to burn its own particulate. To this end, so far I can happily say the gasifier works well. The oven, once heat is in the bricks, expels very little smoke - much less than all my previous ovens by a comfortable margin.
Building a fire in it, as long as one is patient, is also a low smoke process. That’s because the oven has a very direct air supply coming from underneath, with lots of air available to assist with combustion. The fire gets established rapidly, with very basic kindling. I haven’t needed to use super fine dry split timber to get it going. It only takes a few minutes to establish a strong flame in the firebox. At four burns, I can comfortably say this is the most efficient wood fired oven I have ever worked with. It is already the cleanest I’ve designed by a country mile. It seems that my gasifier and high airflow design has been a success.
Progress so far
Here’s a quick summary in words and pictures, now that the oven is nearing completion.
I’ve used various mortars and renders as I’ve gone along, including a special clay render and as well as insulating concrete. Hundreds of hours has gone into researching various combinations of clay, lime, cement, sand, perlite and aggregate. They have been used in different parts of the oven. It has been a process of discovery, and my knowledge of the above materials has expanded exponentially. I’ll also say that once again, the internet isn’t the easiest place to research, with more bad advice than good. But with time, the good stuff begins to shine. It has been a huge lesson in chemistry - which is ironic as I was always the guy who got kicked out of chemistry class at school. Mixing lime or cement with just about anything will yield a chemical reaction!
I’ve used as little steel as possible in this design. There are obvious exceptions - I mean, it IS a barrel oven - though in the end, fortune has allowed me to incorporate steel into places I wasn’t originally planning to use it. For example, it has plate steel decks internally, as I managed to wrangle some great pieces from our local Tip Shop for next to nothing.

Gasification system
To be clear - I have no issues with steel in ovens, it’s just that steel tends to fatigue, so I use it very sparingly - in places which don’t suffer direct flame. Indeed, I designed into this oven a baffle system, which was made of old BBQ plate; the idea being that these would be sacrificial, and would allow the barrel to be spared from direct flame. It turned out that the baffles slowed the oven down, so they have now been removed. I think the distance between the firebox and the barrel being quite large has done the job instead.

Storm water grid on castors!
I’ve built the whole oven on top of a storm water grid with heavy duty castors attached. It can therefore be moved around. The oven has just under 200 bricks, and weighs about three quarters of a tonne, so this is not something you can do with one person - nonetheless it is transportable.
The heavy plate steel decks work extremely well as a setting surface for the dough - better than brick and more consistent. A pleasant surprise, and as they are thinner than firebrick, they have also allowed a bit more crown height in each deck.
In designing the oven, you have to make quite a few guesses. My ‘back of the paper bag’ calculations led me to believe I would be able to load 40 loaves at a time into the oven - but when I actually used it I could see it would be between 24 and 30. Still happy with these numbers - and if you were really pushed you could cram a few more in.

Steam is created by simply pouring water in to the existing spout at the bottom of the barrel lid. This system works as well as any I’ve made in other ovens.
It is actually possible to put too much water in and therefore restrict the temperature reaching the bottom deck, but used correctly this system is as good as a combi steamer! It produces huge VOLUMES of steam.
The firebox has no flue control on the inlet side, just a sliding steel sheet before the chimney, which restricts airflow while also holding in heat. Once the fire is established it’s pretty easy to tune the flame so that the outlet is quite small, while getting maximum draw from the fire. I have found that the oven seems to be very economical with wood so far, and during the tests it held a bakeable heat for over two hours.
I’ve been adding a thick layer of coarse concrete render to the outside this last few days, and I believe this will further assist heat retention. On the second trial bake, I tested the temperatures of the render vs sections without it, and on average there was an improvement of about 5C from the concrete render. I think I will add another layer or two to really maximise the effect.
My original idea was to wrap the whole oven in high temperature insulation blanket, but I decided this would not be necessary. My logic was it takes a good few hours for the heat to penetrate through the brickwork, and mostly the bake will be finished by the time heat begins to escape.
If I was using the oven every day I might consider adding more insulation, but that wasn’t part of the design brief this time around. Adding ceramic blanket would add weight, and draw up heat from the bricks, thereby slowing the oven down.
Insulation actually does have a heat cost. It is best sandwiched between layers of solid material.
From experience, if you want to hold heat in for a long time, it’s best to make the walls more than a foot thick - and in this oven I simply didn’t have enough room for that, as it is built on the storm water grid. This limits how wide the oven becomes.
Issues along the way
There have been some issues with the clay work internally. Some of it has failed, and I was very worried this might occur. As it turned out, I needn’t have worried - the bits that have fallen off can be replaced with firebrick later. It’s a job, of course, but in the short term it won’t affect the oven or the performance.
I have built the oven door with a steel back and hardwood from old fence palings. During high temperature peaks, the timber began to smoulder a little, so I will have to add some more insulation to the door.

Clay work in the firebox
The build has been characterised by lots of stopping and starting. I have been financing the build via a crowd funding campaign, and as such I had to wait until I had enough cash to get each stage of the build done. Then I approached some old friends and was able to get some larger amounts of cash so that I could finance new tools and some of the more expensive bits.
To backtrack a bit by way of explanation - I’ve written about the fire last year in which I lost most of my tools on this blog. Not having things like angle grinders and paint stirrers and so forth made it impossible to do certain jobs. Thankfully, these old friends and accomplices came to the rescue, and enabled me to rebuild my tool kit. I’m eternally grateful!
Another issue has been the weather. Here in Gloucester over the past 6 months or so we have had a number of extended rain periods, which meant that work on the oven, an outdoor process, had to be halted a number of times while the rain did its thing.
There was also the process of experimentation to do - in this build, I embarked on a number of things which I have never done before, and which the internet had very little information I could leverage. For example, the clay mix to coat the hot faces was a real challenge to get right - too much clay meant the mortar simply didn’t dry for weeks on end, and so I had to redo a lot of fiddly stuff a number of times until it was robust enough to be satisfied it would survive heat.
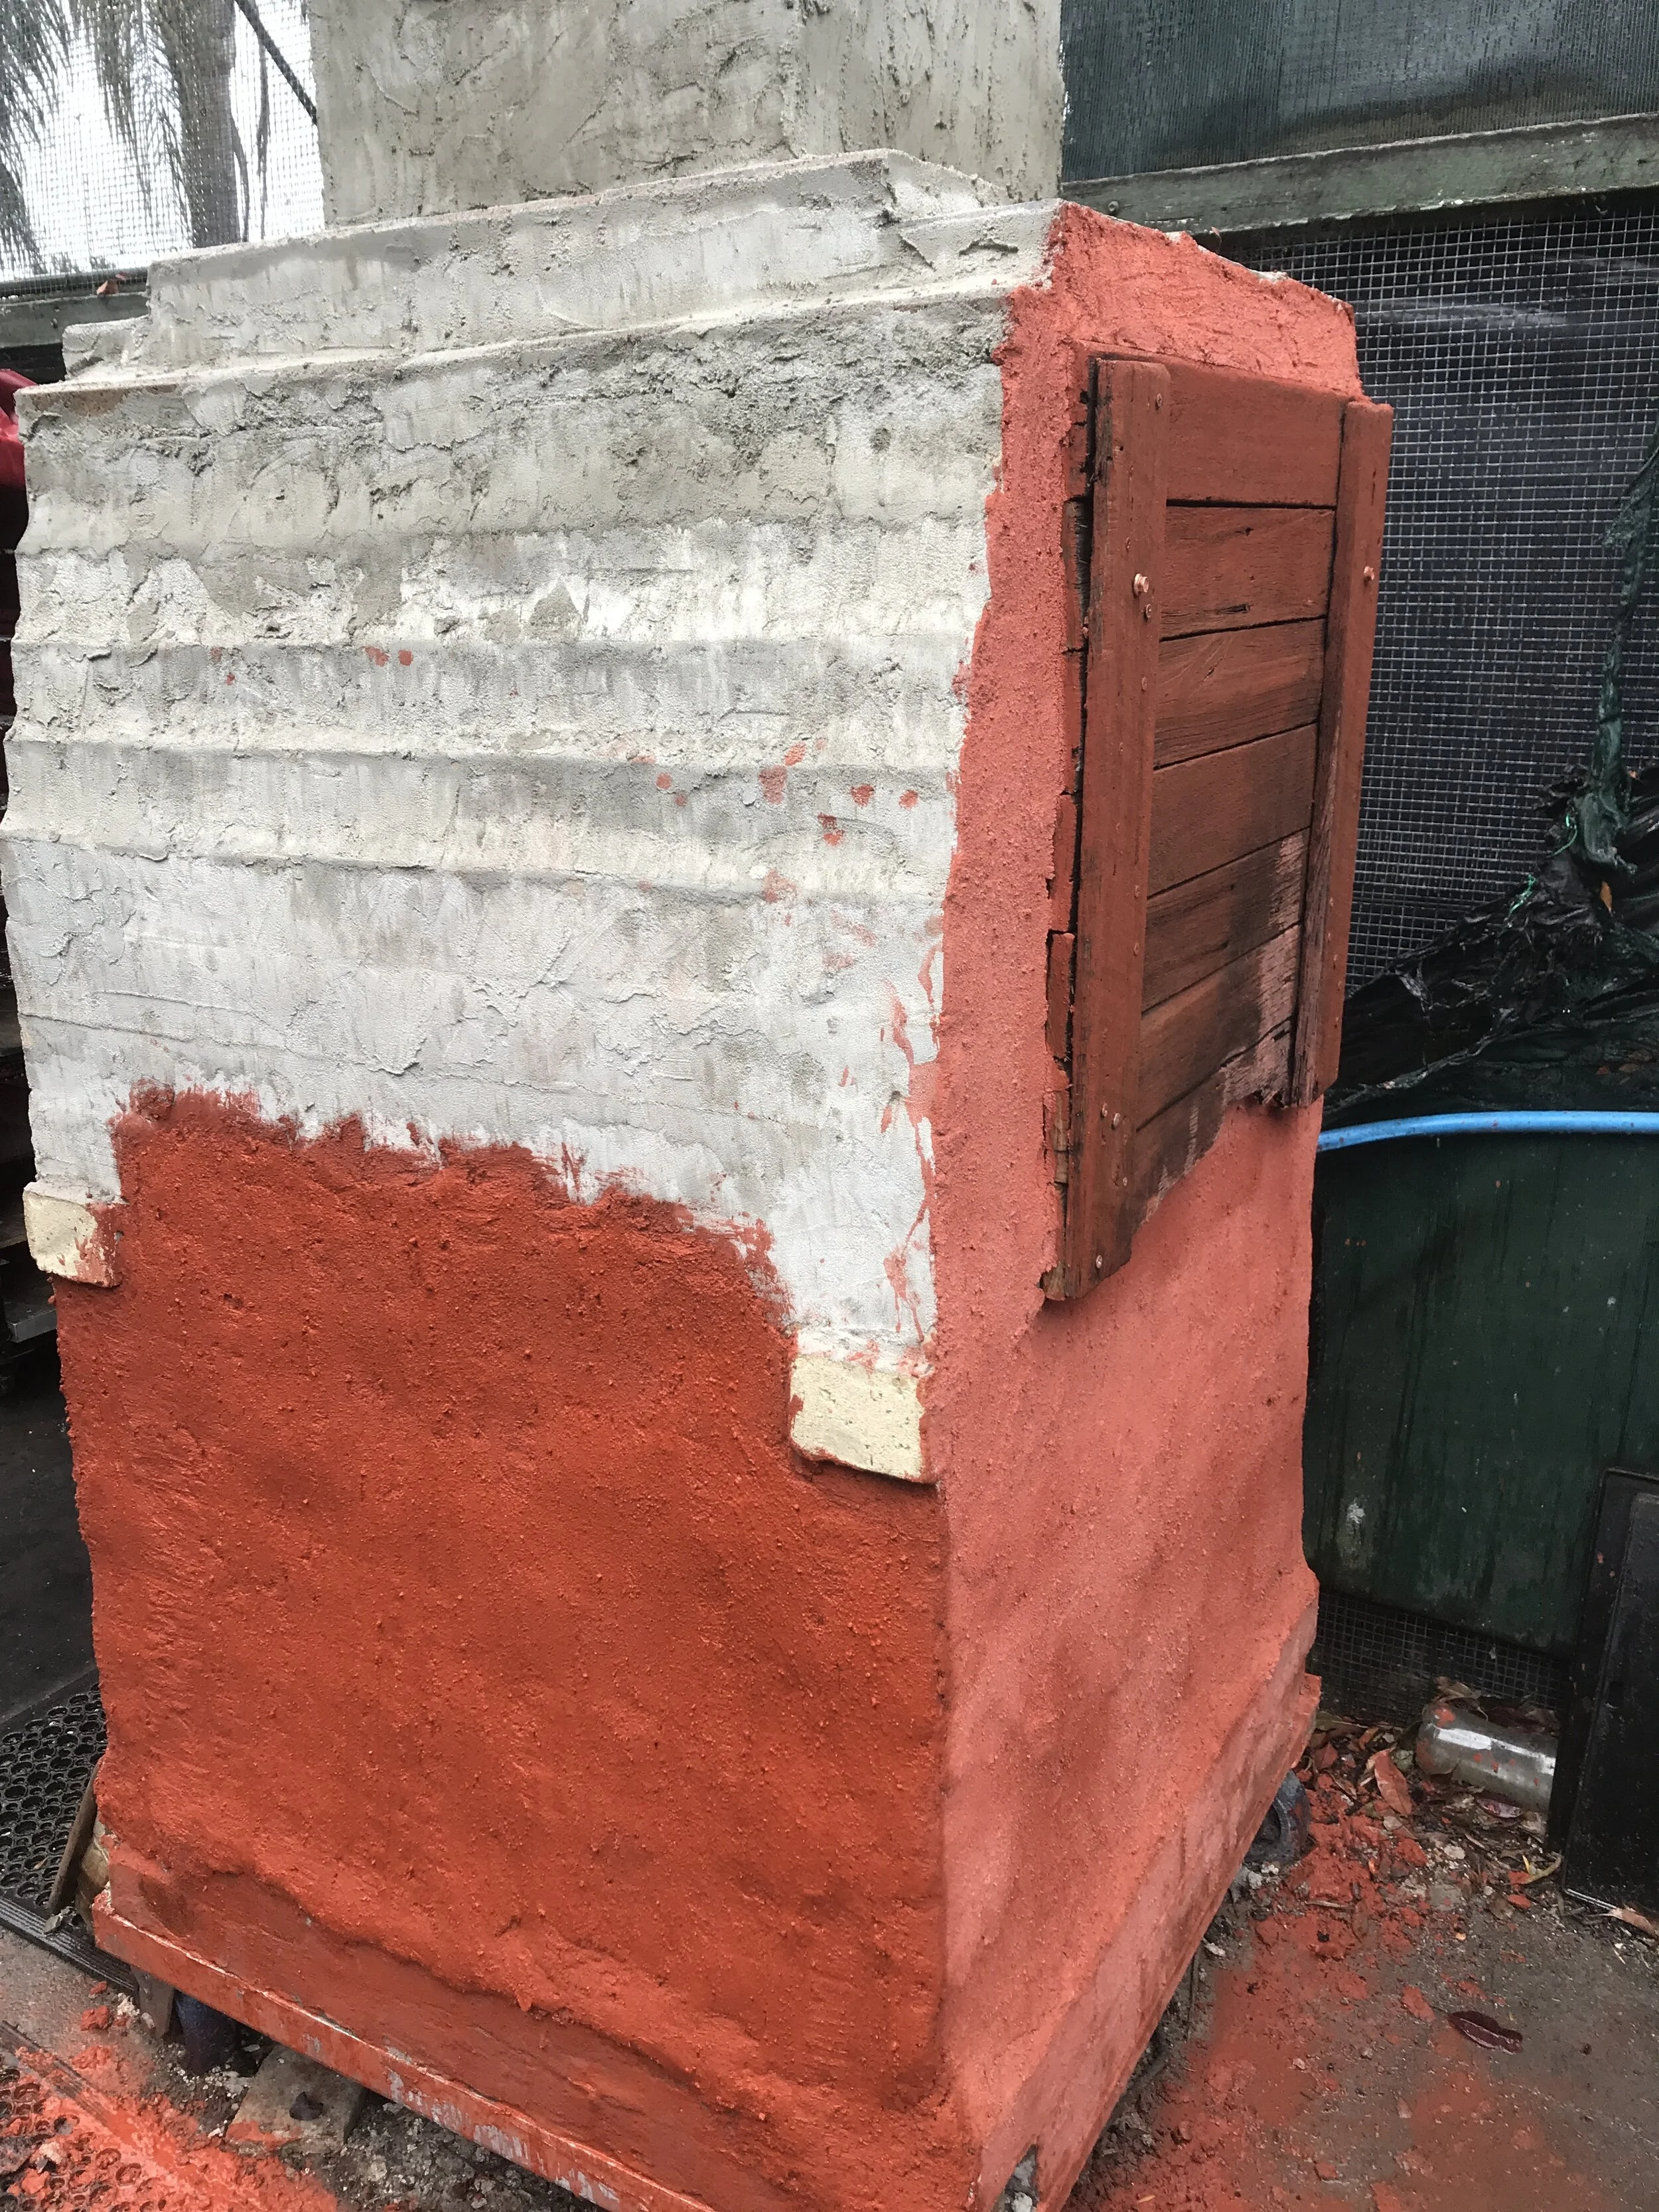
At the time of writing this, I am doing finishing touches - mostly covering the oven with a thick , iron oxide coloured concrete render. It’s very tough stuff, and should protect the brickwork like a skin. It’s a slow process, and will probably require a couple of coats to really get a good surface seal. I plan to let the render cure for a few days, and then fire it up again for another small bake. It’s looking quite similar to the drawing I did when I started planning the oven, which is quite satisfying.
What’s next?
Once I’ve done this next test bake, I’m hoping to get my usual weekly bake going again. It will be nice to have some regular cashflow coming in, and to finally return to the trade I’ve been involved with this past 30 or so years. It HAS been nice not having to bake each week, but I miss the routine, and certainly the regular income the bake provides.
To everyone who has helped me to finance the build, and to those people who helped me do certain jobs which I was unable to do, I say thank you from the bottom of my heart. Not too much longer now, and you will be receiving fresh woodfired sourdough bread once again!
Downcycling - is it really a 'thing'?
I’ve come to view resource use as a critical issue. This applies to me, as a bakery operator. It applies to you too.
The Zero waste bakery
I’ve been working towards a ‘zero waste bakery’ for a number of years now. My approach has been to either remove the waste from the system altogether, or to turn waste into a resource.
An example of the former approach is our paperless subscriber based ordering and supply system, so that there is less waste in guessing how much to bake each time, and no waste paper or ink to do the necessary communications for placing orders and so forth.
The example of the latter approach, that of turning any waste generated or left over from the manufacturing process into a resource, is our waste bread or food scraps being processed (using waste heat) into fuel (biochar) for the oven to burn and heat the thermal mass.

A bin full of biochar getting burnt.
This biochar is also a readily available soil nutrient. It’s rich in nitrogen, and its physical structure encourages worms and various soil grubs to inhabit it, meaning that it assists with the composting process. From time to time I produce enough biochar to compost (I occasionally manage to mess up a dough, or on bake day I have some ‘less than presentable’ bread). Mostly, though, I only have enough waste bread for fuel, as mentioned earlier; I bake to order.
I compost all other organic waste which finds its way through the bakery, and this compost will be used to grow various crops. It’s the next stage of unfolding things here - and when I have set this up, its crop output will be utilised by the bakery.

A bit of treefall - and Pippa, the bakery dog.
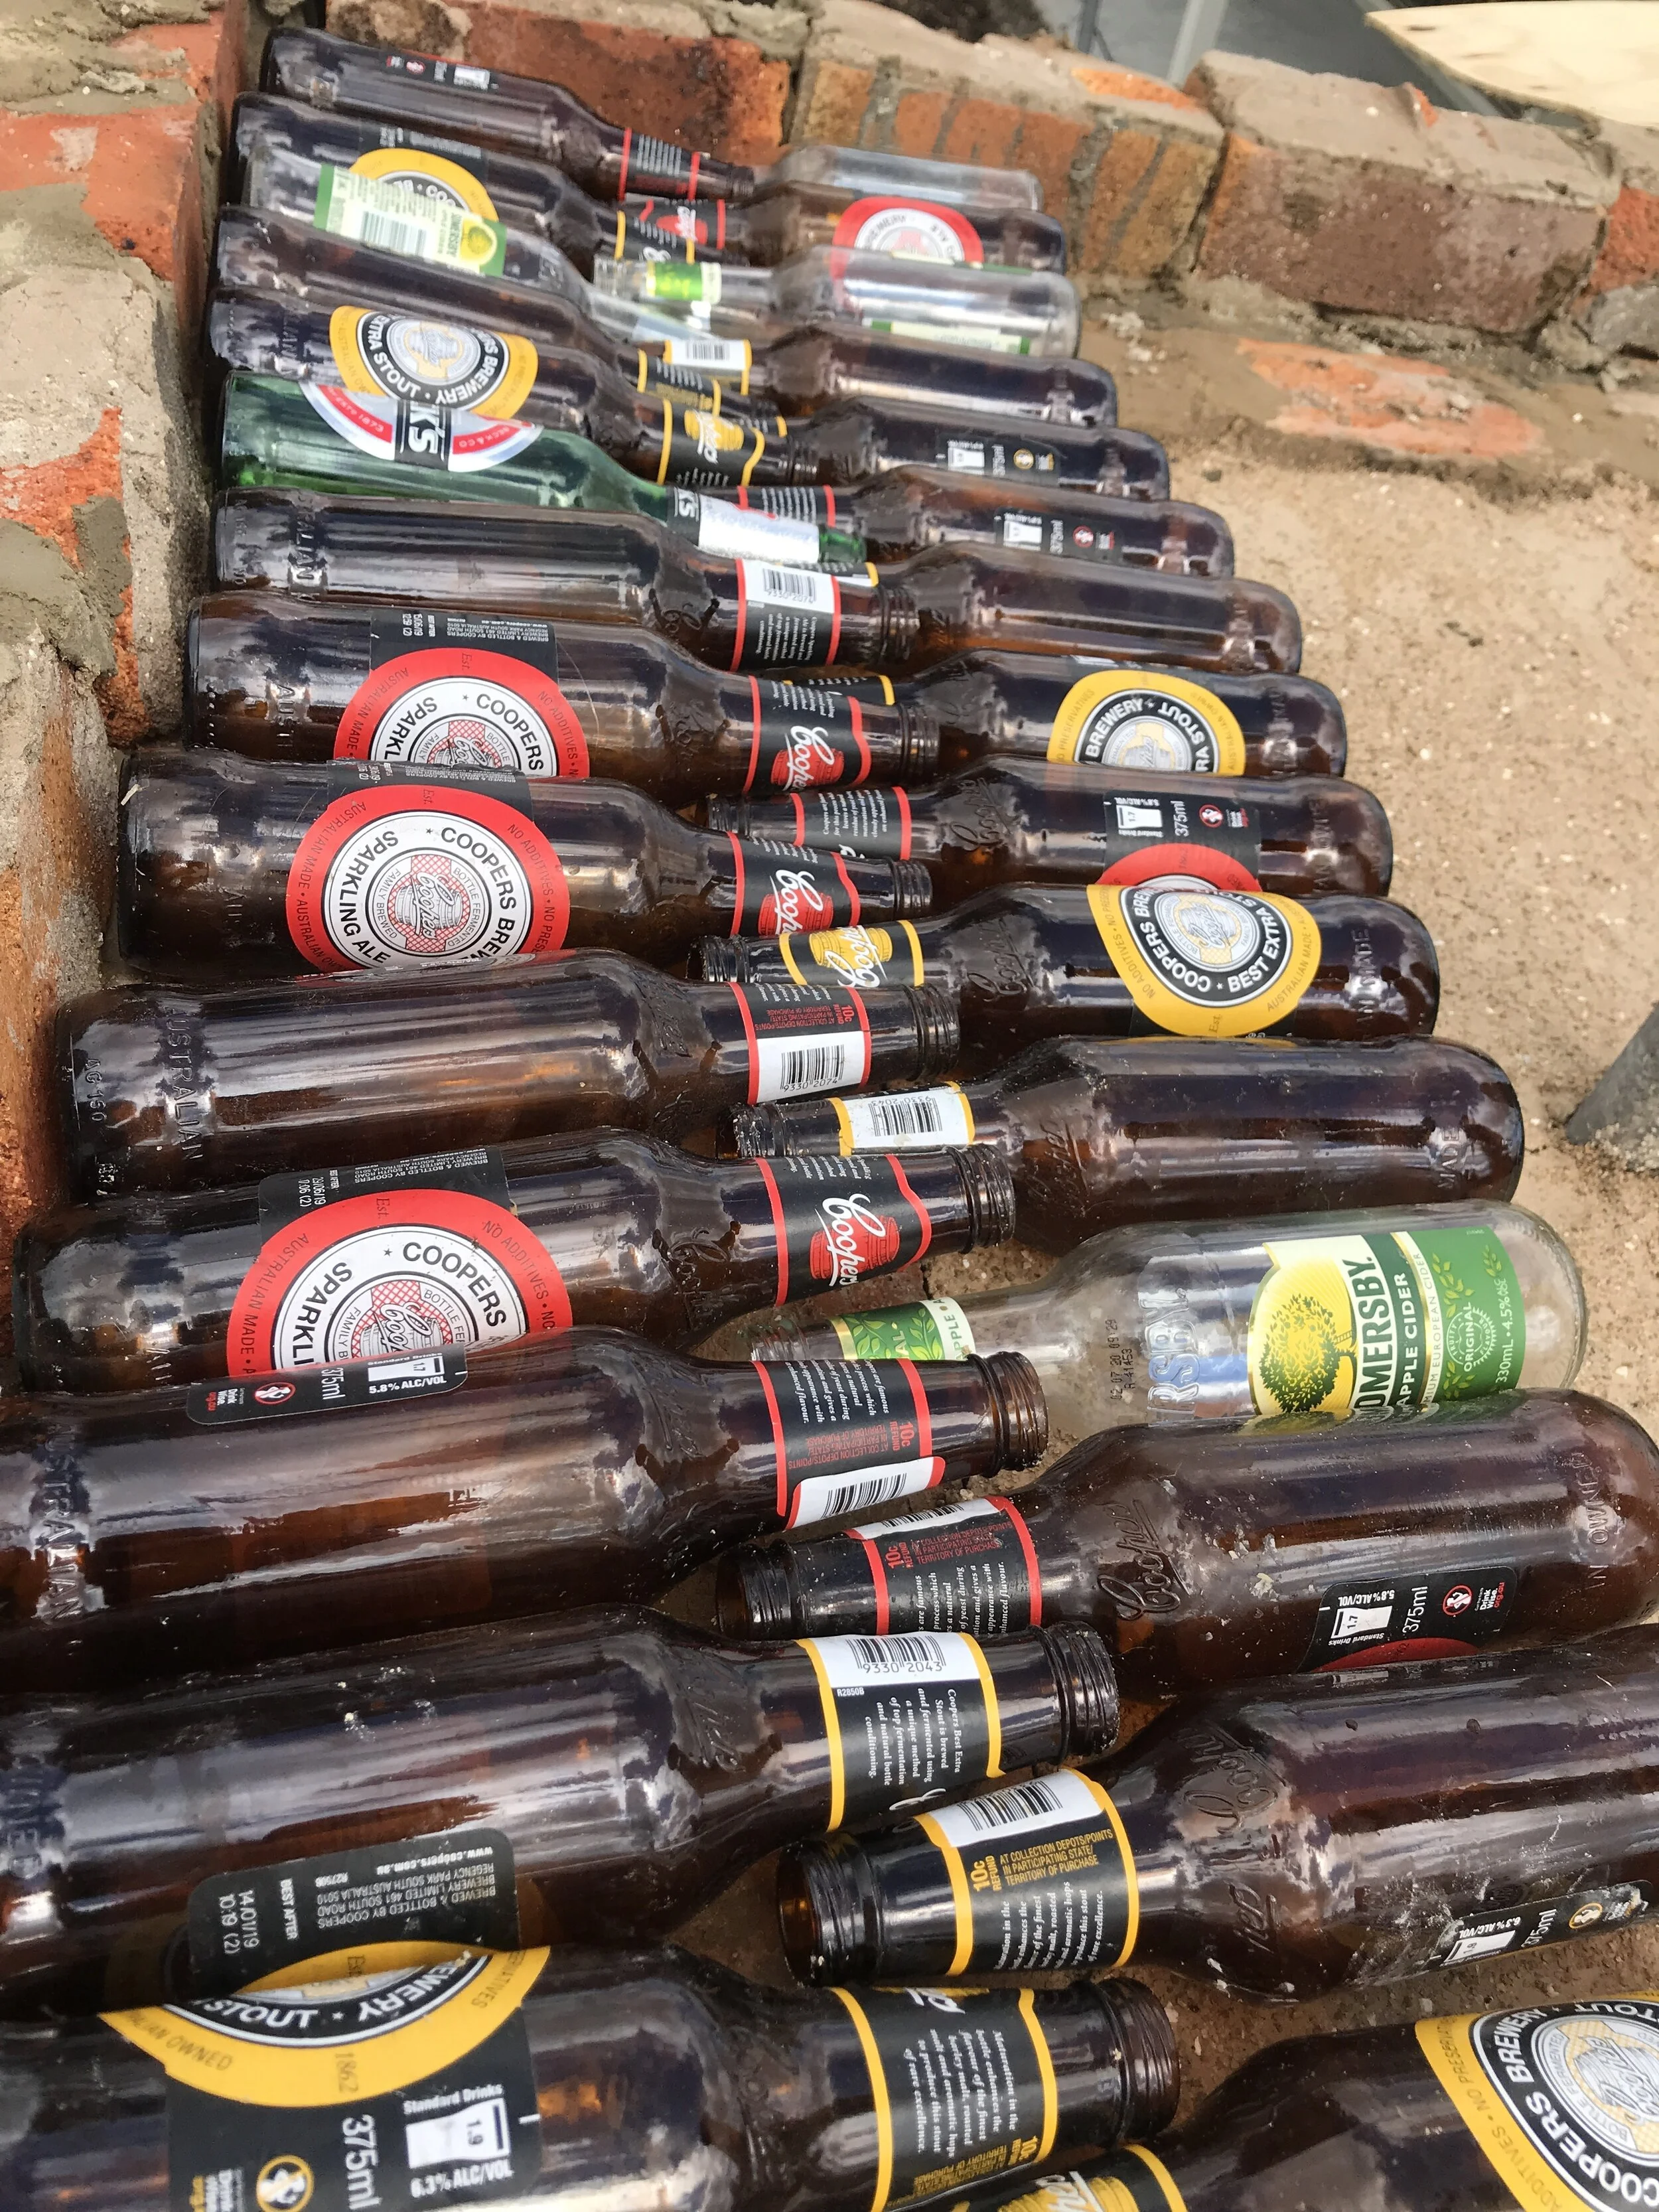
Another example of the way we use waste as a resource would be the oven itself; for many years it has been powered by waste timber - either tree fall, sawmill offcut or building waste hardwood. Upon her reinvention (for the third time) here, she has been insulated with waste brick, concrete crusher dust (leftover from building the bakery on site) and bottles. All waste, and all incredibly useful and fit for purpose.
Upcycling or downcycling?
The idea of a zero waste bakery extends to everything used in the process of making bread. So when a piece of equipment reaches the end of its useful life, I’ve been finding ways to either ‘upcycle’ or ‘downcycle’ it. An example might be ‘transit boards’. Many artisan bakeries use them. They are plywood (or similar) boards which are used to ‘final proof’ dough, just before it gets baked. These boards last for many years, but eventually they get mouldy, and often start to delaminate. Burning them is a problem, because they are made with glues and preservatives, and when burned these produces some quite noxious gases. So they can’t be burnt.

I made this Baker’s Peel for a student in Thailand from waste plywood.
Often I’ve simply cleaned them up, sanded and oiled them. Other times I’ve cut them up and used them to make other things. So far, I’ve made big and small baker’s peels, dough cutters, wooden boxes for making dough in, furniture (shelves) and bakery transport crates. This could be considered ‘upcycling’, I guess, as the new products have a greater value than the old ones. These old bakery boards have become a resource which I can either use again, or remake and sell.
Processing waste bread into biochar is definitely ‘downcycling’. The value of the bread when it’s fresh is far greater than when I have to reduce it to carbon; however, as carbon, it still has a value. Indeed, as a ‘fournier’ (one who runs a furnace), I use the biochar for quite specific things when I’m running my fire. I miss it when I don’t have it, actually! It’s extremely handy in establishing a bit of hot coal quickly. It also flames very strongly when the firebox bricks are hot, so I use it to kick the fire along as I bake.
I also use the semolina which finds itself on the floor of the oven after loading the bread as fuel. When flicked onto the embers in the firebox, it provides quick and intense flame, so that I can revive a fire after the fuel is spent.
I burn anything which can be burned in the firebox - paper, cardboard, cellophane wrapping being some usual things. Here’s the thing; once the bricks get really hot, most things burn with little or no smoke. After the oven has been running for eight hours or so, the bricks are almost white hot. At this temperature (I estimate about 500 to 600 C - my laser heat gun only goes to 500C), the firebox becomes an incinerator. I’d be kidding myself if I said there was no smoke at all, but once the firebox gets this hot, there is very little smoke at all. The firebox is so hot that it burns its own smoke!
I love this idea; smoke becomes fuel. So is this upcycling, or downcycling? It’s a grey area.
There’s a pun in there somewhere.

Downcycling, or just really good insulation?
Lately I’ve even been using bottles as insulation around the oven. These can easily be recycled, but if I use them as they are, without even breaking them, then I’ve saved the energy that would normally be used to recycle them. It’s another example of ‘downcycling’, which I put before ‘recycling’. The bottles work exceptionally well as a means of holding beer, and then to hold heat. Now on the hunt for more of them!
At the moment I’m working on a means of reducing packaging. The bread goes out in cellophane wrap each week (cellohane is NOT plastic. It’s made of cellulose, so it can be made from trees, or indeed any fibrous material including sugar can stalks and hemp), but with a bit of setting up, the bread will be delivered and displayed in special boxes, which will be health code compliant for retail purposes.

Prototype transport and display boxes. Watch this space!
There are many more practical ideas which have already gone into the setting up and day to day running of this bakery. It’s nothing new for me, it’s just an extension of things I’ve been working with for many years now. I feel like I’ve barely scratched the surface; then I look back at what I’ve done and thought about over the years, and I can see I’m making progress towards a zero waste bakery business.
What about you? I’d love to hear about your ideas, or even better, what you have done to make a smaller footprint, or to reduce the wasteful use of resources. And if you want to come and check out what has been done here, and learn how this bakery runs, feel free to come and work with me for a day or more!
You can book by following the link below.