The saga of my new wood fired oven
Shock Horror! Luna the wood fired oven has been decommissioned!

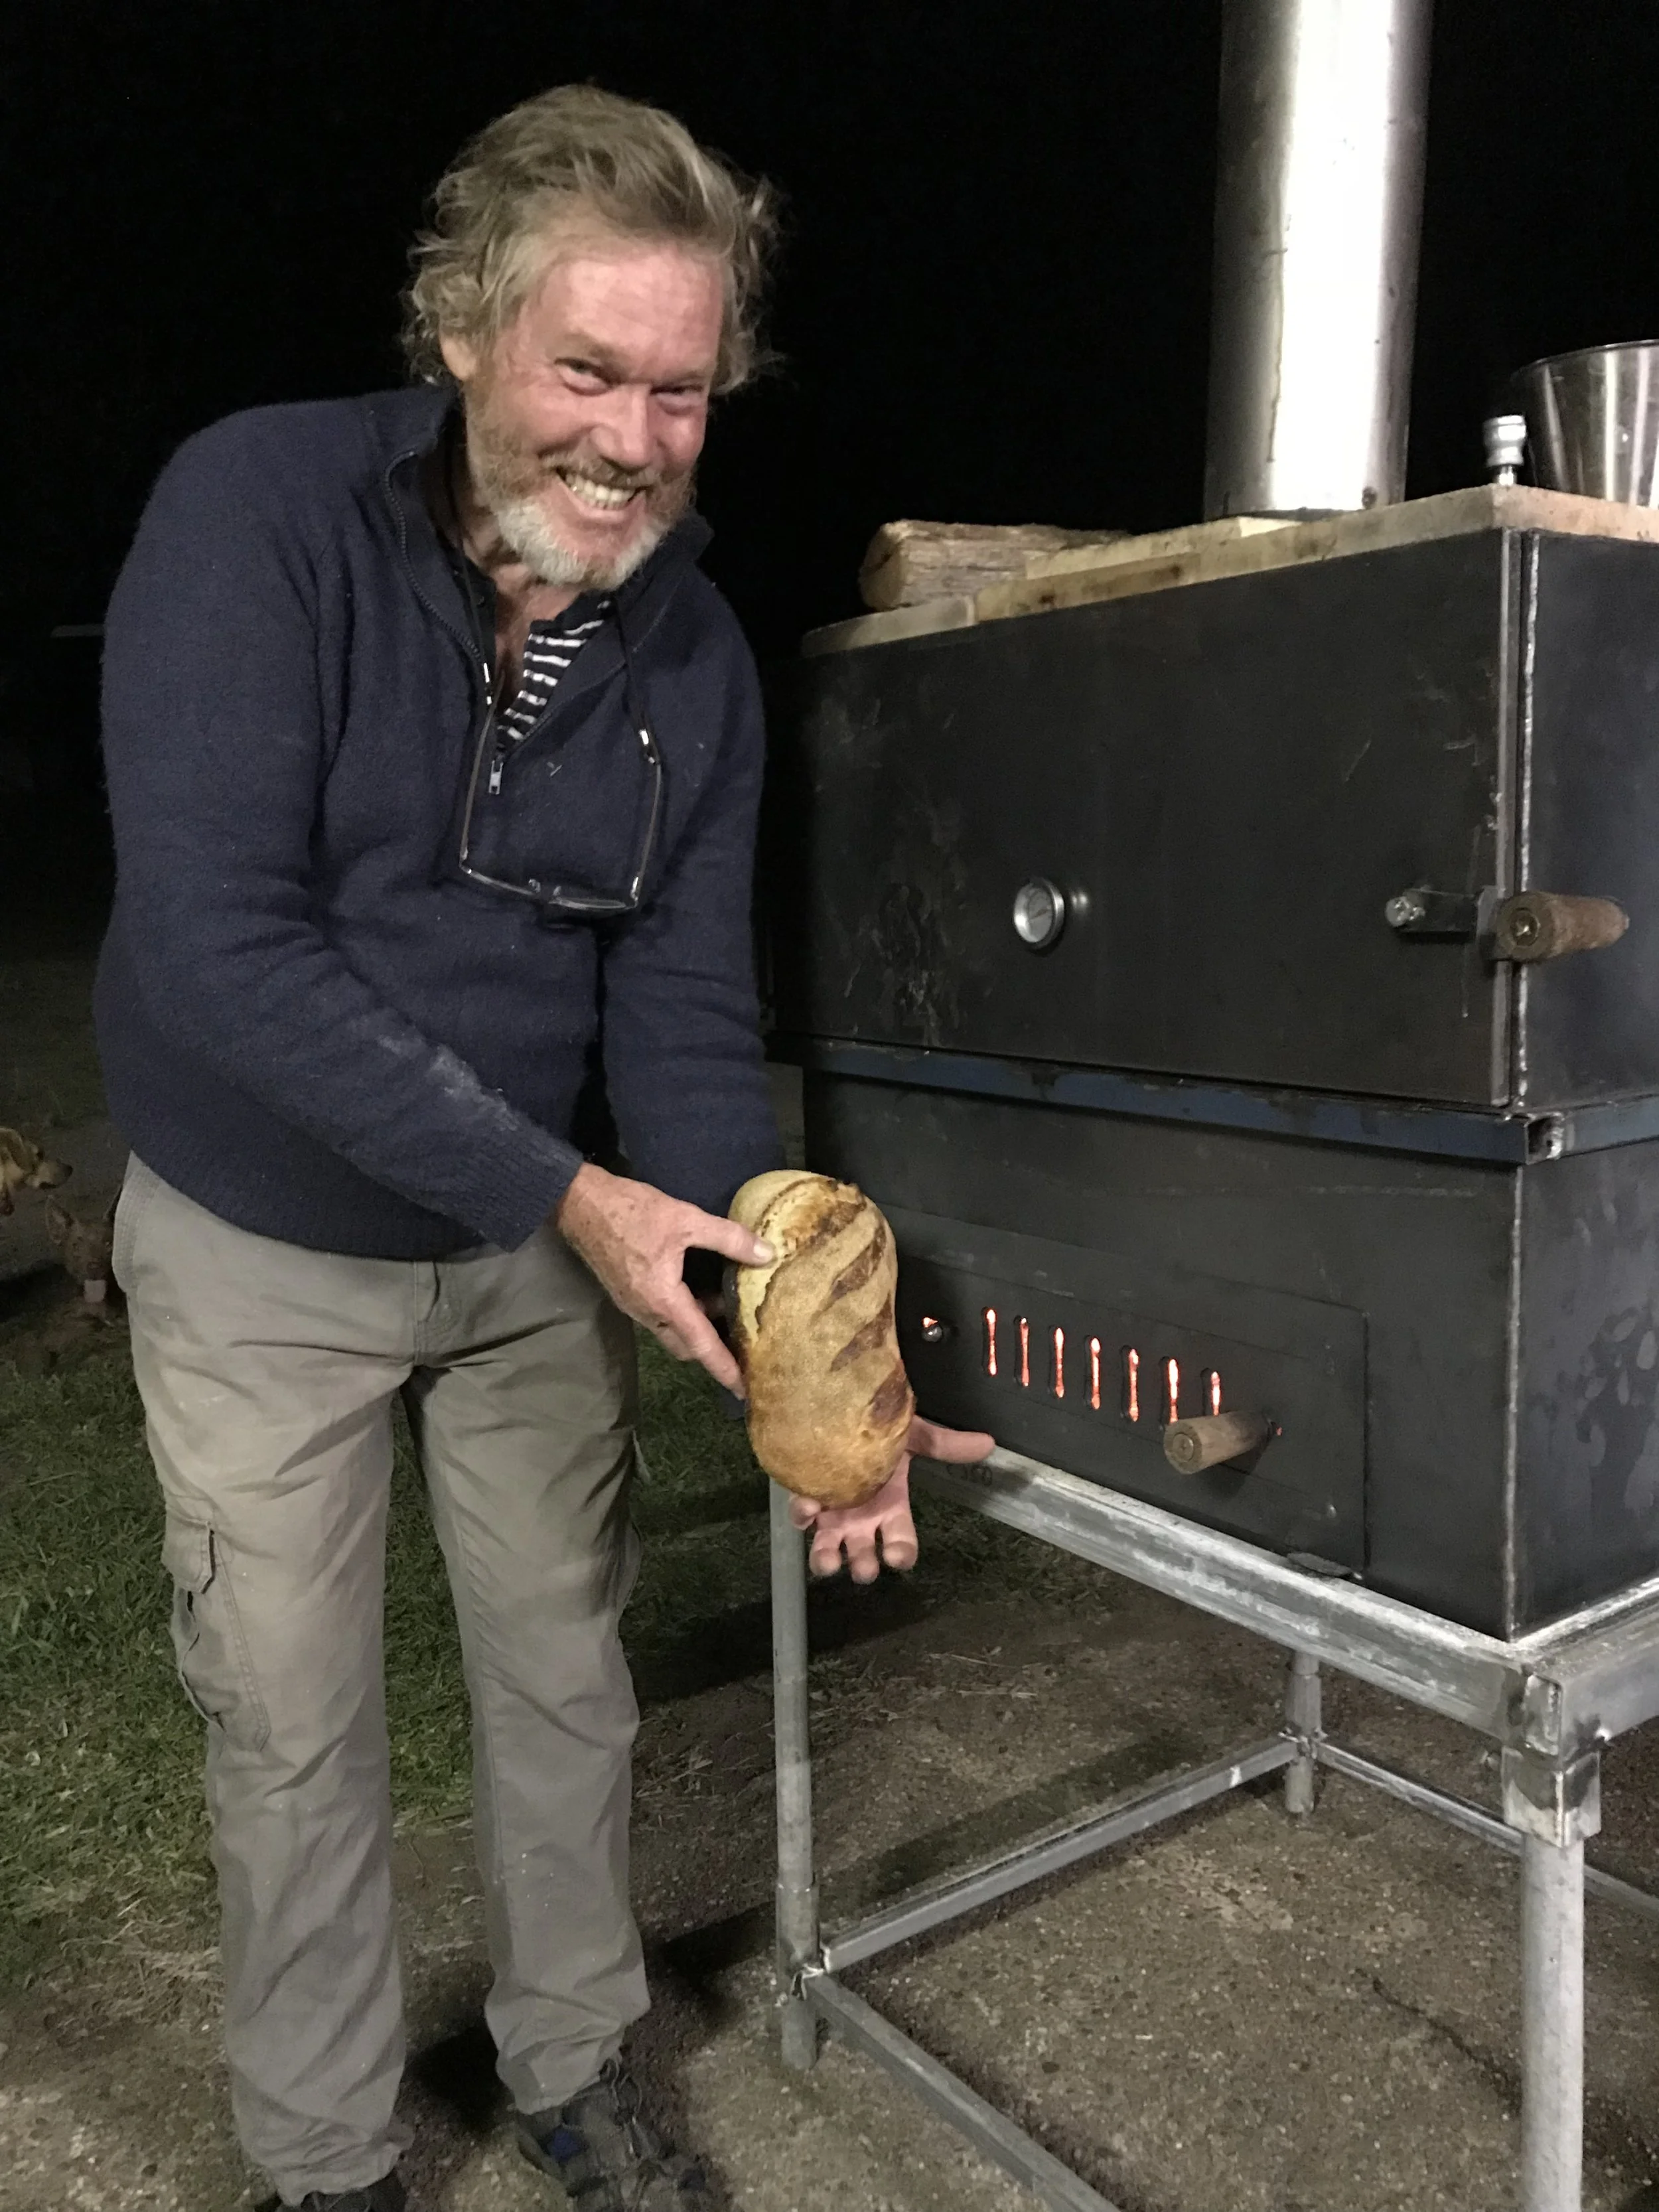
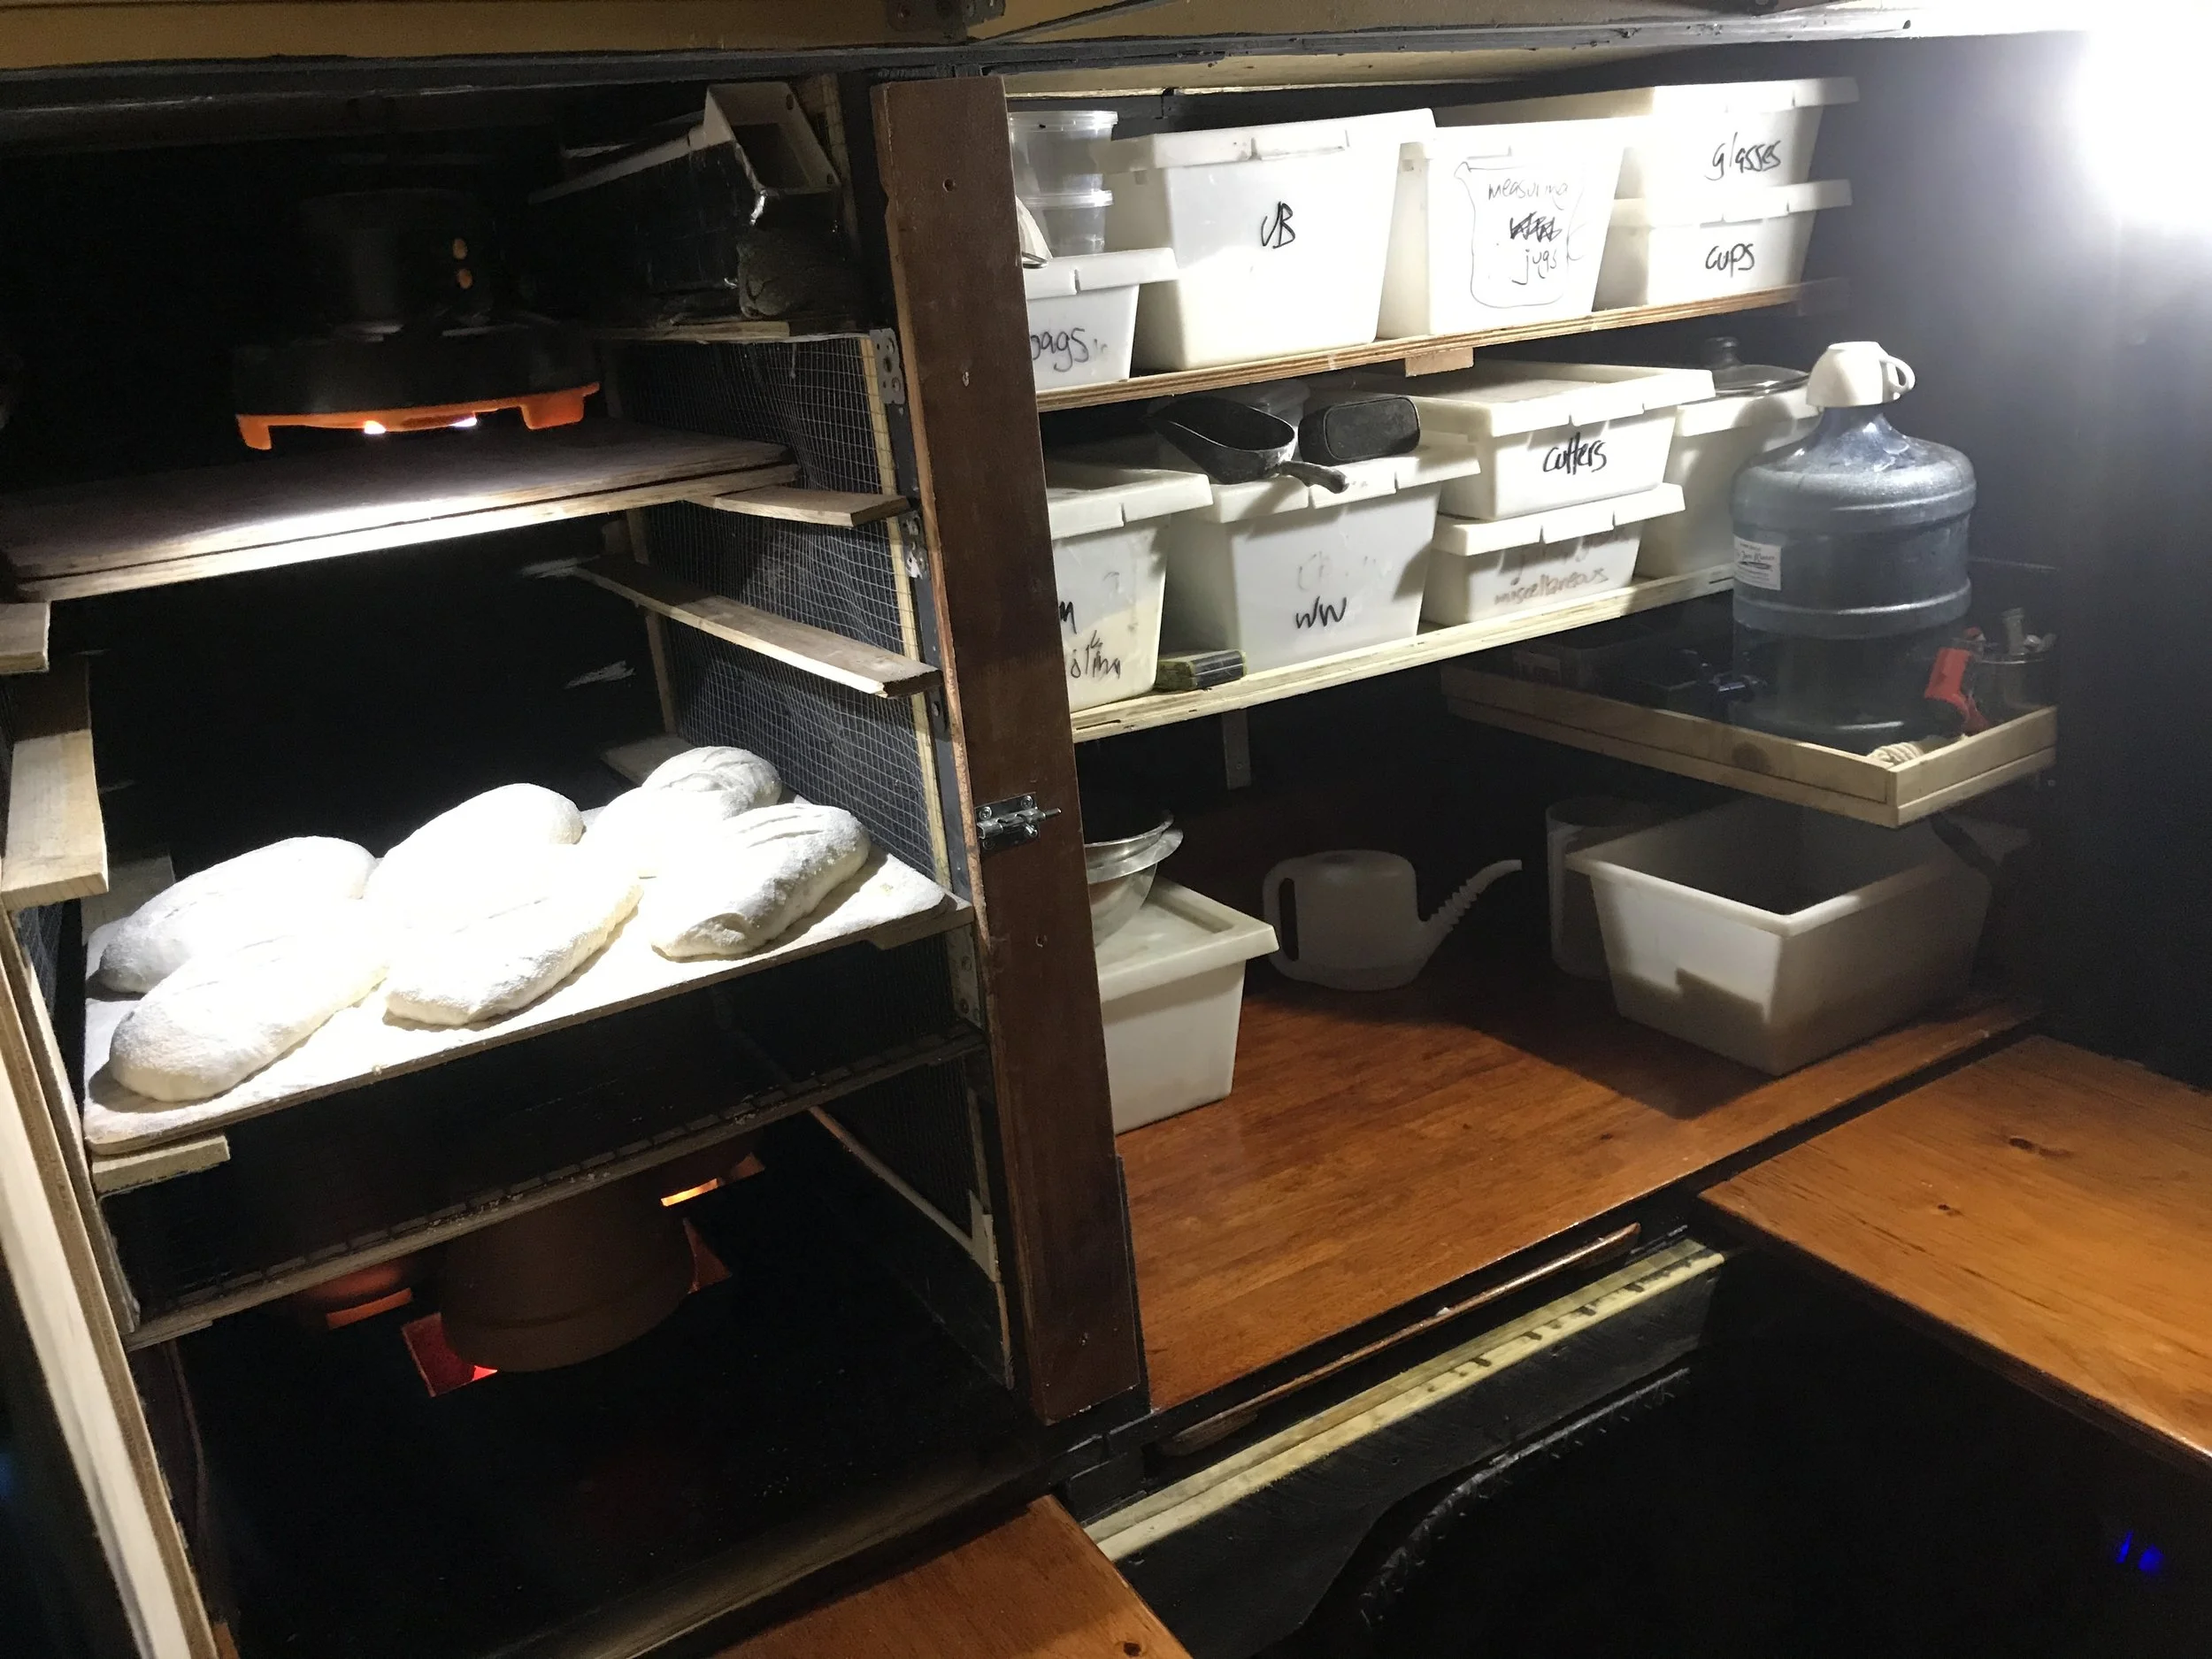
A closeup of Luna’s firebox recently after having the new V baffle fitted.
After over 7 years of use, Luna was facing yet another bout of major surgery. While this could be considered fairly routine for a well used oven, those who follow this blog will know just how much work I have put in to keeping Luna functioning.
After only a year of use since refitting her with a new steel baffle, the same baffle was completely destroyed by heat. This was a 10 mm thick piece of steel which my boilermaker advisor and collaborator assured me would do the job (at least for a few years) instead of going the whole hog and putting in stainless . Cost is always a factor in these decisions, and our judgement call wasn’t the right one. I expected it to last for at least a few years, as I was only using the oven for a day or two each week. But I watched that baffle gradually burn out over the past couple of months, working around it as best as I could for that time, and found myself thinking deeply about my history with every oven me and the boilermaker have ever created this last 12 years or so.

Bertha II and her firebox repairs. Big firebox, and a bugger of a job!
Berth 1, Bertha 2, and Luna, being the names I’ve given to three woodfired ovens I have had a direct and long term association with, have all caused me lots of physical and financial pain. I have crawled inside each of them, as well as other ovens made with our template - in a couple of cases while they were fully hot - and it’s never a pleasant (or healthy) experience. While all of them, after much post production work, have functioned well in the end, they each have had massive problems. These problems usually stemmed from the fact that metal degrades and warps over time, or is simply a very unforgiving material to work with.
Thus, I decided to avoid the material as much as possible in all my future ovens. I’m totally done with the complexity and cost associated with ovens which are essentially using lots of metal to hold masonry in place. Woodfired ovens have been made for centuries successfully with just brick and mortar. Why reinvent the wheel?
I’ve been working on a full masonry design for the past 12 months, and have finally built a small prototype to see how the masonry version of a ‘white oven’ will work. The design has morphed into something quite different over that time; when I look at what I’ve created I can see the original concept, but that’s about it. The way I got to the concept twisted and turned quite a bit.

The new prototype at the firebox stage.
The materials to make the oven evolved - I started with the idea of using common bricks with oven bricks used in various strategic places, which had merit; cheaply sourced common bricks can do the job, especially if you also use high temperature bricks on the parts of the oven where there is a lot of heat. But this prototype was to be built on my trailer, and I was worried they would require a lot of bracing to hold them together. Trailers bump around a lot on the road. Also, weight (at that time) was an issue, and I wasn’t sure brick was light enough.
Then I considered cast cement and AAC (Autoclaved Aerated Concrete), both of which I could cast myself. This attracted me as I could cast exactly to size; if I could cast fairly thin sheets I could save weight. I designed some molds which enabled each piece to lock into each other. The further I went down the casting rabbit hole, though, the more complex things became. The casting process seemed like a lot of fiddling, and was fraught with traps for newbies like me, so this idea morphed into using pre cast cinder blocks and manufactured AAC (Besser bricks and Hebel, being two brands commonly available locally). Off the shelf, at least in theory, it was possible to get pretty close to the correct size for the project. I tweaked the original design a little to accommodate them - then came to a road block - my design worked on an uncommon size of besser brick, being thinner than the usual construction kind. I only needed about six of them, but they were critical to the flue design in the oven. Do you think I could find anyone who would stock or sell me 6? The smallest amount I could order was a full pallet. So I went off looking for other ways to skin this cat.
I’m wandering around various landscaping and building suppliers in my new home town of Gloucester, looking for stuff to build my oven with, when I notice an unusual brick with three large holes. Immediately I see how it could work in my oven. While I wasn’t able to buy it, the retailer put me in touch with their maker - Lincoln Brickworks, just down the road at Wingham.
A quick drive and I’m chatting to the brickmaker himself. Before long he’s showing me their kilns - which coincidentally are wood fired till they get to 700C, then oil fired to take them up to 1300C. Lincoln bricks are one of the last independent brickmakers on the eastern side of the country - and they make their bricks in small batches, catering to the niche of the trade interested in truly bespoke, rustic materials, and craftsman techniques from the past. I’m sold, and the brick maker helps me load up 40 of them to try for my ovens. When I go to pay, they wave me through, saying ‘you’ll be back - we’ll sort it out then!’

Brick sides are on and rendered.
The bricks were used in the final prototype, and they worked as intended. They are stacked directly on top of each other in the side walls of the oven, creating flue pipes for the flue gases to travel along. The flue pipes lead around the oven, transmitting heat from the flue gas directly to the baking chambers. This meant that the baking chambers would heat up quickly, and that I would be reducing a whole layer of brick from my design, making it lighter.
I also built the firebox out of common brick, and lined the insides with firebrick. For a baffle above the firebox, I did some research into concrete, as my local hardware store sold 600 x 600 (2 foot x 2foot) slabs which were about 100mm thick. This was about the right size for the base of the baking chamber, and would save me a whole lot of time and expense with fabricating some sort of lintel to support a brick baffle. This was my first major error.

Then, bang! The concrete baffle exploded!
According to everything I read, concrete could withstand 600C heat. From experience, the internal temps in all my previous fireboxes reached 500C, so I figured I had a bit of wriggle room. I was very wrong. On the first trial firing, maybe half an hour in, I heard a large deep ‘boom’. I checked the baking chamber, and a hole had blown right through the concrete! So much for 600 C! It’s possible the slab I had purchased was not adequately cured - because I had taken temperatures inside the firebox some 5 minutes earlier and it had barely reached 200C at that stage. Far too low, I would have thought, to cause the concrete to react with the heat. Despite this fairly intense reaction, the oven held together.
I visited our local ‘Tip Shop’ (a most wonderful community resource where waste is sorted, displayed and sold for super cheap) and found some really heavy duty BBQ plate steel. I was able to support this underneath the slab, and thereby create a secondary level of baffle. I then used a high temp mortar mix to fill the hole in the slab, and put 30mm oven bricks on the top.

Shelves are added and bricks used in place of a firebox door.
Thankfully, this very quick and cheap repair meant that I could use the oven. I had quite a few subscribers to my bread delivery service (see previous post on my CSB) who, having not received bread during the entire period of relocation and oven building, were starting to lose their minds. I didn’t want to lose them as customers, or to have them lose their minds due to bread starvation, so I was in a hurry to get the prototype fired up and baking.
Over the next 6 bakes or so, I grew quite fond of my prototype tiny oven. It was relatively quick - 15 loaves an hour vs 20 per hour in Luna, which was 4 times the size. It was fast to heat up too - from cold to bake temperature in 2 to 3 hours. It also gave a wonderful kick to the loaves - my original spacing between the shelves was now too small, as the loaves were bigger than they were before by approx an inch! The prototype worked better than I thought it would, and really didn’t require a whole lot of modification, beyond repairing dodgy little bits of my super low budget repurposed construction materials.
But there were some problems. The primary issues were:

A baking chamber door is attached. It opens to a flat 90 degree platform.
getting the door to seal correctly. Smoke from the firebox would creep in under the baking chamber door and taint the bread. The door was a piece of fairly thin steel from a previous oven which had been used as a shelf. The seal between it and the masonry was less than perfect, so I used some ceramic rope and high temperature tape to bog up the gap. It worked, after a couple of less than satisfactory attempts.
creating steam in the baking chambers. Due to my lack of welding equipment (and the lack of welding knowledge) I struggled to fabricate a way of holding water in a piece of pipe. The pipe system has been used successfully in all my previous ovens, but they required a welder to make them. This time I was in a new town and I didn’t know anyone here. Eventually I purchased some rectangular hollow galvanized bar and filled the ends with cement to block them off. Then I cut some grooves along their length with an angle grinder, which allowed steam to escape. They worked extremely well. They held close to a litre of water, which provided enough live, gentle steam to the baking chambers for some 15 minutes at a time.
properly insulating the surrounds of the oven. I built the oven to fit into the existing space on my trailer. There had been a small oven there previously which I used for demonstration bakes and workshops. To save time, I simply beefed up the existing insulation around the wall area and re-did the roof insulation. The floor had a layer of insulation too, as well as a sheet of rubber to isolate vibration from the oven. The oven base was 100 mm hebel, which is, in itself, insulation. The outer shell was made of this also. I figured I had it all covered.
I did not. After the first couple of production bakes, I observed smoke around the top of the oven. This worried me, so I removed the entire roof and replaced it with brick and corrugated iron. So much for weight! I could no longer tow the oven, but at this point I was quite happy for the oven to be semi permanently set up at my new home base in Gloucester.

Fired up for the first time!
After another couple of bakes, I noticed smoke coming out from UNDER the oven. While the top was now fine, smoke coming from under the oven really confused me. There was so much insulation and brickwork around the firebox, it just didn’t make sense. I added another layer of brick to the base of the firebox and the problem seemed to go away. Or it became less obvious, as I now know!
Needless to say, I was inspired by my little protoype. However, I could see that my construction techniques were not up for the long haul, and that I would need to be doing a lot of spot repairs to keep the little oven alive until I could make a bigger, more robust one.
Last week, after finishing the bake in record time, I felt I had mastered the oven, and made all the necessary tweaks for performance I would need to do for a while. I went to bed early and was keen to get the bread delivered the following day. A good bake is a wonderful thing for the psyche.

An early test run alerted me to the need to rebuild the chimney!
I woke to a loud ‘boom’ at about 2.30 am. I could see flickering light through the curtains, and stepped out to find the trailer and a couch in the undercover garden area fully blazing. As I ran to grab the hose, a second couch exploded into flame - I had put them perhaps 8 feet away from the other side of the trailer just two days earlier.
The fire from the trailer had engulfed them and caused the explosions. Luckily the local fire brigade came in 20 minutes or so, but those 20 minutes were I think the longest in my life, as I pointed an ineffectual hose in the general direction of the blaze. The fireys brought it under control in about half an hour. I wandered around on the footpath outside with loaves of freshly baked bread at 3 am for them as some form of thanks.

First bake!
(photo, on B+W film, courtesy of Maira Wilkie)
I lost the trailer, as well as a fair proportion of my power tools. I also lost some printing equipment, and a good deal of pride. I thought I had insulated the section around the oven well, and indeed I did. The problem was under it. I built the oven on AAC (hebel), with fire bricks on top. There was a layer of wool insulation batt under the oven, with a thick rubber matt under that, and foam under that, and finally the timber frame built on the trailer years earlier. The weight of the oven had slowly flattened the insulation, making it less effective. The heat from the firebox had found its way through all the insulation, and had created a smouldering heat issue which had slowly, over quite a few weeks, degraded the timber framework underneath. This simply gave way, the oven tilted backwards, and hot coal spilt out of the firebox, setting the whole trailer alight.

Disaster! Half a dozen bakes later, the fireproofing under the oven fails, and the oven tips over, catching the trailer on fire and destroying it completely.
Apart from feeling stupid at my errors of construction, I felt defeated. It’s taken me 30 years to be at a comfortable place with my craft. I get to bake commercially just once a week, with civilised hours. I have many happy subscribers to my bread delivery service, which has continued each week now for two years or so. I try to impart good info to anyone who wants to know. I’m deeply immersed in my craft, as anyone who has spoken to me will be quick to agree. Many 300 series students have gone on to start their own successful micro bakeries, as a result of my inspiration and guidance.
Over the years, thousands of home bakers have come to learn at my 101 workshops held each month, and many stay in touch, attending numerous workshops to keep their bread making processes improving and growing . I’m deeply happy to be part of the bread making renaissance in Australia. When I began, bakeries were heading away from natural bread; there was not an interest in using organically grown grain or in artisan milling or fermented bread at all. Now there are hundreds of successful bakeries turning out great bread all around Australia, and when I speak to them they are rightfully proud of their product. There are a number of mills creating superb, sustainably grown flour from quality grain. Of all this, I can say I was one of many who worked to make it happen.
The bakery business has been tough on me, and my body. I’ve earned a living though, and I’ve largely been my own boss for a long, long time. I’m rich in what I know, and I’ve been further enriched by the responses people have to my bread, my teaching and my professional guidance over many years. I’m not materially rich, though - I discovered some time ago that I have little interest in material gain beyond what I need to keep going. This I know is both a problem, and a solution to bigger problems.
Thus I find myself questioning whether I should go on; to rebuild, or to find another way of earning a living. I feel like I have been a professional crash test dummy for too long. It’s my own doing, I know. And I do question my sanity from time to time.

In Western Australia teaching Bush Baking a couple of years back, with the trailer on its second incarnation.
So I’m asking you, dear reader, to really help. I have decided to seek contributions to a crowd funding initiative, to help me build a new oven and to rebuild the site, so that I can get the School of Sourdough properly established here in Gloucester. I need to buy materials to build the oven, as well as some new tools and some professional assistance so that the new setup won’t have any issues down the track. If you think I should continue doing what I do, then follow the link below and make a contribution. If I can raise $20K I’ll be over the moon. If I can raise half that, I will still be able to get things up and running again. Any amount will encourage me to continue. Even nice words and a bit of virality by sharing this post will go a long way.
People who can contribute will be rewarded in any way I can - small contributions will get free bread to equal value when the oven is finished - provided you are somewhere in the Hunter Valley region. Bigger ones can receive one on one tuition/consultation to the value of their contribution down the track, here at the bakery or over the phone, if necessary. Really big ones will receive eternal gratitude and whatever else I can give to say thank you. And everyone will be supporting a community enterprise as well as a journeyman baker who needs to know if he’s mad or not. Please chip in and help me get this project finished!
The Community Supported Bakery a year on
It’s been just over a year since I began baking purely for subscribers here in the Newcastle region of NSW. Before that, I focused on local markets as my retail, but after six years of doing this, I found that in our region market operators have become very risk averse. They increasingly would cancel the market at the first hint of rain or wind. Not great for the local baker who has a day to sell their bread.
It’s my second attempt at creating a Community Supported Bakery - my first was a few years back when we set up the bakery out the back of Wesley Mission in Newcastle West. We were delivering bread every Saturday all over Newcastle, and while it worked quite well, the retail business and Cafe we built on the Wesley site took over.
I learned from our experience in supplying people directly that the subscription baking model needed a few tweaks for it to work long term. This time around, after building the model around Pick Up Points (PUPs) rather than home delivery, I believe we’ve got it close to right. I’ve approached a number of strategically located businesses, whether they are retailers or cafe operators, and offered them the opportunity to become part of our Community Supported Bakery network as Pick Up Points for our subscribers. This provides the subscriber, the PUP and the bakery with positive benefits. The bakery gets a retail location for bread. The subscriber gets a convenient place to pick up their bread, and the PUP gets added foot traffic to their shop or cafe.

The baby oven I used to bake my way across Oz became the CSB’s first baking tool.
When I began baking for subscribers again a bit over a year ago, I was using the Bush Bakery MkII for the task of baking maybe a dozen loaves every Friday night here at the farm. My proper bakery, here in the old dairy shed, wasn’t built, so I was living in my caravan, trying to keep things afloat. The Bush Bakery MkII would have to do while I was waiting. It was less than perfect, and the bread I was baking from it was also less than perfect. But I pushed on anyway. Thankfully, my customers were patient.
I was hankering to bake great bread again in Luna, my main flame. She was still in pieces out the back shed as Craig Miller was refurbishing her in his spare time. I had to play the long game if I wanted to have her baking again.
Not easy for me. I always want things finished asap so I can get on with other stuff. Everything seemed to be in permanent slomo. I was going crazy. My weekly bake in my little baking trailer kept me sane.

The dough box takes shape.
At first, I was doing the whole thing completely by hand, using my ‘dough box’, which I’d recently completed, making it out of used plywood transit boards. Transit boards are what we call the plywood boards used to rest finished and shaped dough on before baking. I had plenty which were old and needed to be replaced, so I cut them up and created my dough box from them.
I had just returned from my trip across the country in the above mentioned trailer bakery, and I’d been using standard dough tubs to mix my dough by hand for the trip. The idea was to make the dough box before I left, but I ran out of time. As soon as I got back, I set to work on it, and it was finally finished. I made it waterproof and super smooth, and began making dough in it. I found that it worked pretty well for 10kg of dough - in fact, it was surprisingly efficient.
The Community Supported Bakery (CSB)
A Community Supported Bakery can take many different forms. In some places, bakeries are set up to meet community demands - and thus are entirely funded by these communities. Bakery entrepreneurs have used crowd funding to get their dreams up and running for many years. I remember meeting a baker from Berlin who had done this some 20 years ago, simply by putting handbills on the walls of cafes to gather support from the community. In other places, customers and staff are members of a cooperative. I attempted this idea a decade ago in Newcastle and failed miserably. I have seen it working though, and while the environment for a cooperatively run bakery might not be here in Australia (with a raft of incorporation laws which make forming a coop very expensive to do, and then also expensive to run when it’s finally set up) , the idea has a lot of merit and could work in places where there aren’t such onerous laws. I’d be very interested to hear from anyone who HAS managed to get a cooperatively run bakery up and going here in Australia though!
There are lots of other ways for a bakery to be supported by the community. Turns out, communities like to have bakeries which are run by people rather than corporations.
There are CSBs which simply have a membership system, with members helping to finance the bakery’s operations each year by their membership fees. In return, members get first dibs at the bakery product, often for a discounted price. Other CSBs go for a share system, where the investors receive a dividend when the bakery becomes profitable. Still others tag on the back of established buying groups, enabling them to bake directly for buying group customers.
This incarnation of my CSB is supported by a subscription system. It’s a way of supplying customers over the long term with affordable, nutritious bread. Users of the system get discount bread by committing to a number of loaves which they can have delivered, one at a time if they like, over an endless time frame. The more loaves they commit to, the better the price per loaf. Bulk buying without the bulk, if you like.
It’s like a phone card - they just top up their credit when they need to, and receive supply whenever they want. Better prices are also available when a customer orders a number of loaves at the same time. This means that a reseller can be part of the system too. Bread can then be purchased by anyone at a standard retail price without actually having to subscribe by simply popping in to one of the resellers and buying it over the counter.
The subscription system can be tweaked to be time based, which encourages regular use. Ours isn’t done that way here, because in Newcastle, at least, people want maximum flexibility. It’s a tough market! Nonetheless, our subscriber base has steadily grown over the year, and we seem to be holding on to our customers.
Our CSB so far
So a dozen loaves, paid for in advance by members of the community, was the start of it. Now we are baking about 85 loaves each time I fire up Luna the oven. We have an ‘apprentice’ who is learning the trade from the ground up, and students regularly attend our bake day workshops so they can learn how it all fits together.
Over the coming couple of months, we’ll produce a hundred loaves per bake. At that time, I’ll consider firing Luna up a second day each week - once I’ve found someone who can distribute them more widely. Eventually she’ll get fired up more days, one day at a time. The whole idea is resource management - so when the oven’s five or six tonnes of thermal mass gets fully soaked with heat, she becomes much more efficient. I just have to find homes for all the bread!

Do you know someone who would like to distribute the bread more widely, so that we can fire up Luna more often? Leave a comment after the article and I’ll be in touch!
In the meantime, our bakery is settled into a steady rhythm. We have students visiting throughout the week to learn or revise what they have learnt. Tuesdays we make sponges for dough. Wednesdays we make the dough. Thursdays we de-gas the dough we’ve made for the first time, and prepare firewood for the bake. It’s a 72 hour process from start to finish, and it makes the bread really digestible and full flavoured.
Here on the farm there is a pretty good supply of wood, but there’s always the process of trimming the wood we have to fit Luna’s firebox. This happens on Thursdays. It’s also a good day for weeding our small garden, produce from which eventually becomes jars of pickles and pastes for our family, friends and subscribers. It’s also the day I do oven maintenance - Luna gets a deck and firebox clean, as well as a blow out to clear her flue system of all soot.

Friday is bake day, and we start by cutting and shaping all our dough, ready for the final proof. Luna is fired up in the morning, and we keep her going until baking time begins in the late afternoon and early evening. By this time Luna is steady at about 220C. When we have good fuel, it’s a matter of holding her down to temp; when it’s not good, it’s a matter of cranking the firebox along until the decks get hot enough to bake. Baking currently takes between 2 and 4 hours. Then we let the bread cool on racks, and pack it for delivery Saturday morning.
Saturday is delivery day, and I head off to our 5 Pick Up Points to deliver the bread early in the morning. Deliveries are all done by 10am. Then we rest, ready to do it again next week!
One or two Sundays each month are dedicated to teaching the general public, with 101 and 102 Workshops held. It gives people a chance to learn about proper bread as well as to have a look at what we do here.
It’s a comfortable rhythm to live with, and allows time for things like gardening, administration of our subscriber system (which takes a good few hours each week), essential maintenance of the bakery and oven, and development of the site here at the old dairy shed.
Once we start baking twice a week I can see the time becoming tighter, but there is still quite a bit of capacity time wise; the routine here somehow allows for extra stuff without too much stress.
If you would like to see how things work in our Community Supported Bakery, why not book in and learn about the process for yourself or for your group? You can bring along as many as 6 people for the one price.
Coming to grips with 'Erratic Bread Syndrome' at Yirri Grove

The Nullabor, twisted by me, in a camera.
The final workshop for the Esperance leg of the trip was held at Yirri Grove Olive plantation, out on the other side of good old Esperance.
I love the twist and turns of this journey; how they continue to surprise me. Plain sailing was never the objective of this trip. Nor was it expected, with an eighteen year old car and a recycled bakery shop being towed about fourteen thousand kilometers while crossing the seventh largest continent on earth. Not to mention a Kelpie canine and a Burmese feline who both ‘volunteered’ to ride with me. Esperance

We’re going WHERE?
(It was an open discussion between us. I did the talking and they did the listening.)
The Tour Down South was to dive in a deep pool of unknowns; and to have a go at something I hadn’t done before.
I often delude myself that I have been the inventor of lots of things in the bread world, or that I was the first one to do a particular thing. Pretty much every time I begin to think this, somebody from the other side of either the world or Australia lets me know that in fact this thing has been done centuries ago. Nonetheless, I’m still pretty sure I’m the first person to take a wood fired bakery across Australia and back on a six by four trailer. Please, prove me wrong!
One of my clients in Perth called my idea to do this trip ‘ballsy’. At the time, I wondered how he could see it that way. I mean, a coolroom powered by the breeze, and a wood fired oven, some flour, some firewood. No water. What could possibly go wrong? And if something did go wrong, well, I could turn to YouTube for help, like everyone else does. Or Instagram. Or Facebook.
We are never alone, even when we are in the middle of the Nullabor.
(Except, of course, there is no internet in the middle of the Nullabor. ‘Null’ means ‘none’. We are not talking a little ‘none’ here either. We are talking a big ‘none’. You have no idea how big ‘big’ is, but I’ll return to that idea later.)
Now I was on my way to Yirri Grove Olives, where Anne O’Neill ran a small plantation and pressing facility. They also have a cafe there, just past the wetlands of Esperance.
This is a place where there is a sign on the side of the road which keeps drivers updated daily as to the condition of the roads in the area. It’s not uncommon to lose a road or track due to various reasons - the tides, the changeable (and very windy) weather and so forth. The sign at the edge of it helps locals and visitors keep up to date on daily conditions.
I’m ushered into a large awning behind the cafe, plenty of space for the Bush Bakery MkII and my coterie of creatures. Being protected from the elements in this elemental place was a relief.
We are immediately accosted by a noisy crew of guinea fowl, who come charging down to the fence beside the awning to let us know they were on the job, and not to try anything stupid. Immediately, my kelpie Pippa is fascinated. She’s a cattle dog, and these are like cattle fowl. I think she was impressed. Or confused. Or both.

Here’s Anne, looking blurry. That’s because I’M blurry.
Anne and her husband are truly the most welcoming folk I think I have ever met. From the moment I arrived to the moment I left three days later, I was embraced like family. This experience of ‘welcoming the stranger’ has proved to be a profound one for me. Everywhere I stayed across the continent, I felt like a stranger; and yet, was welcomed almost universally. There were exceptions, which may well be expanded upon in some other blog at some other time. On this night, me and my family of furry friends were made welcome. We rested well.
The time gap between workshops was minimal. It took me back to ‘working’ as a musician back in the day. Pack it up, and set it up again somewhere else. Do it fast, and do it efficiently, so you can do it again. Breakfast hospitality was new, and welcome - so much so that before I knew it I had another dozen keen bread makers waiting on me to finish setting up!
At this workshop, I stumbled on another clue which would eventually lead me to solve the riddle of the ‘Erratic Bread Syndrome’ which had been plaguing me of late. For the past few workshops and bake offs, I had mixed results - which have been discussed in this blog on numerous occasions. Some breads I had baked along the way were okay, some were pretty good, and some were atrocious. I just couldn’t seem to get it consistently right. It would have been easier to solve the problem if the bread had been consistently bad - but the mixed results made it harder to work out where the issues were.
Thus far, I had observed that my list of variables was huge - variable flour, variable water, variable temperature and variable weather. Indeed, the entire trip had been one variable after another. So my breads were simply following suit. But how could I grab this thing by the tail and get control of it?
I was pursueing this process of ‘reducing variables’ when it occurred to me that the age of my starter between feeds was also a variable. I would sometimes go a couple of weeks between bakes, and as such I would simply keep the desem (dough starter) cool as best I could - but feeds were fairly irregular, and temperatures varied quite a lot as well. My ‘coolgardie’ style evaporative cooler was next to useless.

The first incarnation of the ‘Coolgardie Coolroom’.
(As you might not have been following this story, I’ll explain. I designed the Bush Bakery MkII to be as ‘off the grid’ as possible. I reasoned that a simple evaporative cooler, a la the ‘Coolgardie Safe’ crossed with a ‘zeer pot’ would work well enough to store dough and sourdough starter in the middle of Winter crossing the desert.)
I went through lots of evolutions in thinking about this idea of an ‘evaporative coolroom’, until I ended up with something that was capable of being both a cooler and a proofer. It had expanded clay balls from an aquaculture setup contained in screens along the walls, which were filled with water via a bleed hose. The water, theoretically, evaporated from the clay pellets via airflow, which came through the walls as the trailer moved through the air. It was like an automatic evaporator, which was supposed to reduce the temperature of the air.
When I wanted to 'proof’ (warm) the dough just prior to baking, I simply added a spirit burner (a ‘trangia’ alcohol burner) and a plate of water mounted on top, which warmed up the box and created steam. As far as this side of the equation was concerned, the proofer worked a treat. The cooler, on the other hand, could at the very best remove 5 degrees c from the air temp. I concluded that there wasn’t enough air flow to really circulate the air. My plumber’s skills were also lacking, as I couldn’t get the bleed hoses to work properly in the screens.
THe ‘Coolgardie Coolroom’ in proofer mode.
As I write this blog post some months later, and I can tell you that I’ve now made the cooler work via a small solar powered battery and some low friction computer fans mounted in the walls. These work pretty well, but when I was on the road the ‘coolgardie coolroom’ side of things was an impediment. I had resorted to purchasing ice on a regular basis to keep starter and food cool on the road. This meant that the starter could swing from under ripe to overripe quite quickly.
As I traveled, there was not always the facility (decent water, relatively enclosed space and good weather) to set up the mobile bakery and feed the starter.
The starter had been fed just before the last bake at Bread Local. It had been getting quite a bit of a workout, actually, with three bakes in just a few days. So that eliminated another variable.
In the workshop, we made dough as a group, using a few techniques which enable people to be able to make dough cleanly almost anywhere, including out in the bush where there might not even be any table! Our doughs worked really well, though were not ripe in time to bake in the wood fired oven.
Because I had been experiencing ‘Erratic Bread Syndrome’, I pre made some dough the day before the workshop so the students could bake it on the day. This was like a kind of insurance policy; the dough may go off too quickly, or not at all, so ‘here’s one I prepared earlier’ came to be my primary backup. I also shaped some dough ready to bake; I really didn’t expect it to last in the faulty cooler. When I checked it in the morning, it had skinned, and, miraculously, somehow it seemed to be in good condition, beyond the skin that it had formed. The ‘skin’ is normally a negative, but in this case it was holding the batards together in the cooler.
As I mentioned earlier, there were lots of layers of preparation for this class - I was determined to remove baking risk. We baked various stages of dough that day, fresh dough, overnight proofed dough, and pre formed dough - unsurprisingly, with mixed results. Some were okay, but there were also some flat ones.
The mystery deepened. It didn’t seem to matter how much preparation I did - how many ‘insurance policies’ I made to ensure I had some decent bread for my students. I still was having failures, and that meant I was still struggling to figure out which of my variables was causing the problem.
I had removed another variable as well - I had returned to using Wholegrain Milling flour, thanks to Tiff using it at her bakery. I knew wholegrain milling’s flour, so I bought a bag from Tiff’s supply (thanks Tiff!) before I left. Prior to this I used whatever I could get at the local supermarket. I was confident I could work with many different types of flour, but this was proving to add a variable.
So two variables eliminated now.
Water, temperature and weather remained variables to be dealt with. I may never get on top of the last one; but if I do, there’s an excellent subject for another blog post!
It seemed like I had still had numerous problems, all at the same time. It never rains, as they say. Until it pours.

The Bush Oven, insulated by the use of some firebricks and terracotta pots placed on top.
I was becoming more aware of the limitations of my Bush Oven. It had very little insulation, and so was dependent on constant fire to achieve good results. In a workshop situation, this is a hard ask, as it can become a full time job just keeping the fire at the right pitch. I can rarely do both things - keep a fire running well and teach a group of people - simultaneously. Often, a compromise involving intense fire activity interspersed with none whatsoever, was reached. Not what the scientist in me would call ‘consistent’. So add this to the ever growing list of variables in my current baking practice. Occasionally I would delegate a member of the group to this task of ‘keeping the flame that never will die’, but the finesse involved ends up becoming too much for the student. They too struggle to attend the class and run the fire at the same time. This technique was also flawed, but it did help when I had a good firekeeper.

Just another variable to absorb in the problem solving process - firewood!
To add to this, different locations offered up different timbers. This place had a legendary fuel, mallee root, which many people rave about. I used to have access to it in the Blue Mountains from time to time - we had a firewood fetcher fella who would bring it down every year for us, and with my slow combustion fuel stove (which warmed the house at Medlow Bath back in the day), Mallee root burned as hot as coal, and as long lasting. I thought it was amazing, and got it whenever our wood fetcher had it. This time around, though, my little baker’s oven didn’t like it at all, as it generated lots of hot coal. The Bush Oven (in fact all of the ovens I’ve designed), prefers flame. The flame pushes the flue gas more efficiently all the way around the baking chamber. Hot coals, on the other hand, tend to make the bottom deck too hot, and the top deck gets too cold.
Some timbers are better at delivering flame than others, and these were not always plentiful. As they say; ‘You pays your money and you takes your chances’. So yes, firewood quality was another variable I had to deal with.
Reduce two variables, Starter and Flour; and discover another two, the Oven and Firewood. Two steps forward, and two steps back. Could it be that I have discovered the ‘Bakery Two step’ ?
After the workshop, I decided to process some of the leftover dough we had made that day - I had a hot oven; why waste the heat? I asked Anne and her husband to swing by later for an extended bake off. The oven had been running for many hours by now. I processed the dough through the second proof, and shaped some dough the students had left as well. By the time Anne and her husband came with wine and cheese and, of course, olives, all the dough had been shaped and was proofing nicely. I baked off some mini baguettes and some batards. All were sensational. The shape held, and the crust and crumb were both very acceptable. It had been the best bake I had done since before Perth. So what was I doing right?

Mini Baguettes and some batards.
We already established I had fresher starter. So one variable didn’t play into the results of the day. Secondly, I was now using consistent flour, rather than whatever I could get at the supermarket along the way. Another variable under control. Third thing: the water had changed. Some of it had been filtered and treated with light, which was how it worked here at Anne’s orchard, and this tasted pretty clear. The water I had used throughout the west had tasted like clay, almost without exception. Some of the dough made at this workshop was made using ‘clear’ water; but some of it had been made a day earlier, which hadn’t been filtered in the same way.
Thus, the quality of water wasn’t necessarily part of the solution here. Nonethless, if I was going to solve problems, understanding all the variables was essential - it was a large list, and getting larger and more complex as I went along. Changes in water quality were still a potential contributor. So I filled all my tanks with this clear water. I had about 60 litres all up, so this would have to last me until the next time I could load up with good water. I had a trip across the Nullabor, and my next workshop a full two weeks away, near Mildura back in Victoria. So I was most likely to use most of this water before I would make dough again. At least this time, I would have nice water on board to cross the desert!
(Last Nullabor crossing, the water I drank was ‘whatever was available’, - hadn’t allowed for enough storage capacity on the trailer - local water was often undrinkable. I had since added more water storage.)
I still managed to reserve about 10 litres of clean water for dough in Victoria, so that keeps that variable at bay for a little while!
So at Yirri Grove workshop it was back to Great bread. Since I’ve crossed the border into WA, it’s been Crap bread, Great bread, Crap bread, Mediocre bread, Great bread. The Erratic Bread Syndrome continues.
With two variables removed, another mitigated against, and quite a few more identified, I was actually feeling like I was making forward progress. Onward across the Nullabor one more time. I had the mental strength necessary to do it this time. I was getting used to life on the road. It was making me stronger.